(This was originally posted on the Kablamo Engineering Blog)
Application state in front-end clients is a complexity that is at best managed, and at worst the reason you can't deliver new features.
There are many ways to handle application state in modern front-end applications. You may be familiar with React's useState/useReducer hooks, Redux or one of the many other state management libraries. But, when you pair that state with business logic, a finite state machine can be a much better way to manage it.
Finite state what?
A finite state machine is a mathematical model of computation. It is an abstract "machine" that can be in exactly one of a finite number of states at any given time. The machine can transition from one state to another in response to some inputs known as events.
You define a finite state machine by a list of its states, its initial state and the events that trigger each transition.
Key takeaways
- We can define a number of states a machine can be in.
- The machine can transition from one state to another given some triggered events.
- The machine can be in exactly one state at a time.
What does this look like in a real-world application?
Let’s take a real-world made-up (😝) example. You’re building a profile page for your application.
When users use your application for the first time, they have a blank profile. As the user enters the profile page, you want the profile page to display the profile if the user has one. If they don’t have a profile, you want to provide them with a way to create one and save it. If they do have a profile, you also want to offer them way to edit and save their profile.
Instead of having that imperative business logic scattered around the code, we can define it in a flow chart that everyone from developers up to stakeholders can see and understand.
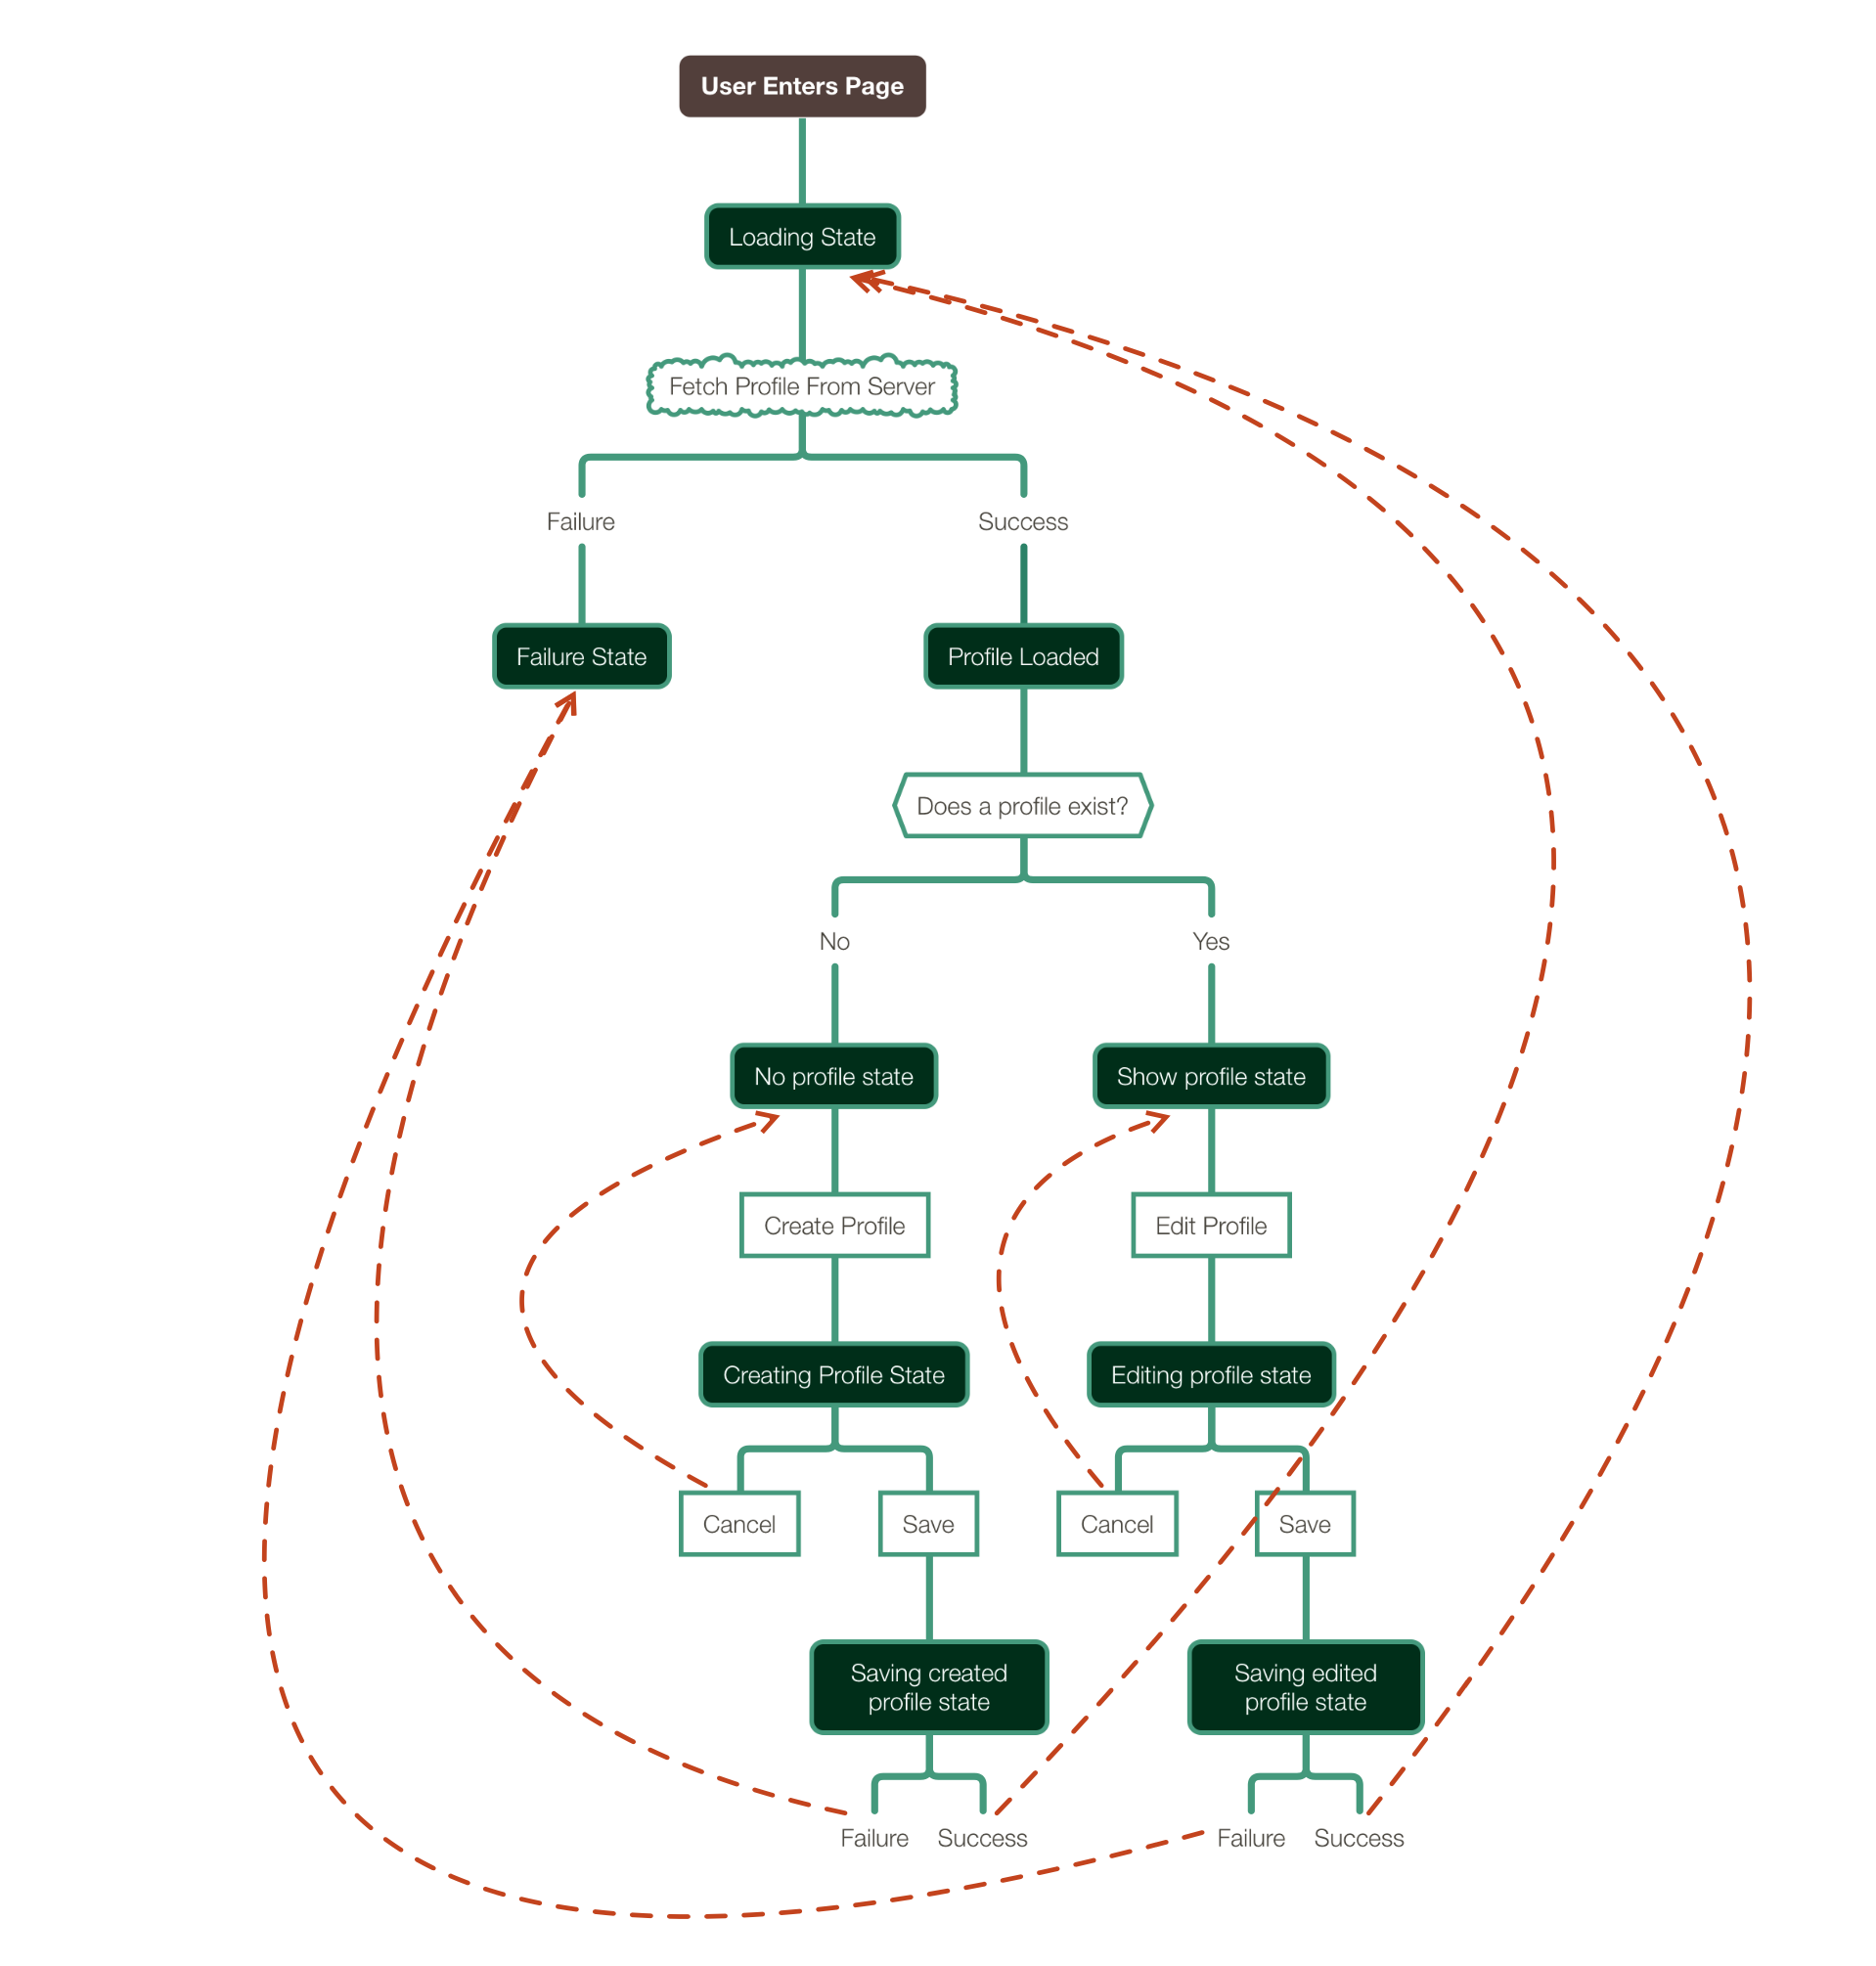
From the diagram we can see that there are 9 distinct states:
- Loading - While the app is fetching the user profile from the server
- Failure state - When any server communication fails
- Profile Loaded state - When the server has responded from the request for a profile
- No profile state - When the user has not yet set up a profile
- Creating profile state - When a user is creating a profile
- Saving created profile state - When saving a created profile
- Show profile state - When there is a profile to display
- Editing profile state - When a user is editing a profile
- Saving edited profile state - When saving an edited profile
The lines and arrows show how we transition from state-to-state. Sometimes we transition directly, sometimes based on a condition we transition to one state or another.
XState
Now that we know all the states and how to transition between them, we can go ahead and create our state machine using XState.
XState is one of the most comprehensive Javascript finite state machine libraries with additional tooling like visualisations.
We'll start by creating an XState machine using createMachine.
We'll give it an id and an initial state which we'll say is loading, and we'll add a null value for profile and error to the context which you can think of as similar to React's state objects.
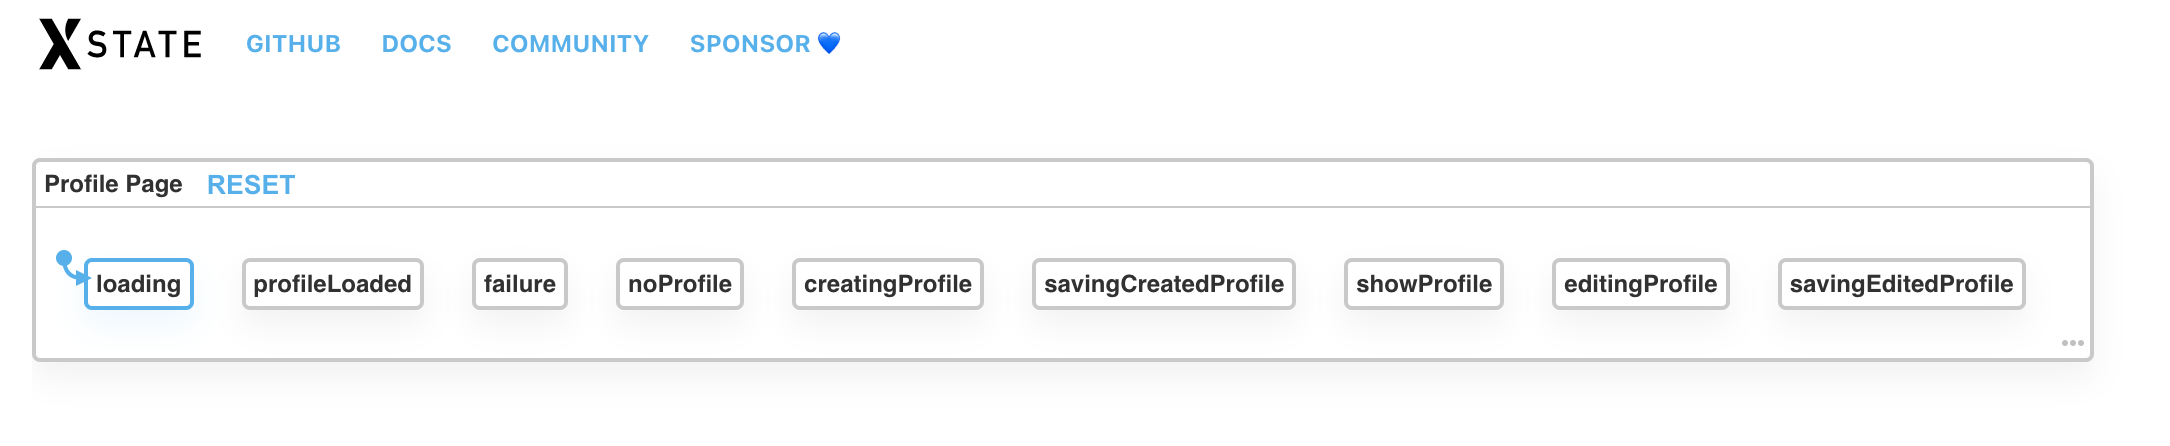
We'll also list out all of the possible states.
import { assign, createMachine } from "xstate";

const fetchMachine = createMachine({
  id: "Profile Page",
  initial: "loading", // initial state of our machine
  context: {
    profile: null,
    error: null,
  },
  states: {
    loading: {},
    failure: {},
    profileLoaded: {},
    noProfile: {},
    creatingProfile: {},
    savingCreatedProfile: {},
    showProfile: {},
    editingProfile: {},
    savingEditedProfile: {},
  },
});
This yields a diagram of unconnected nodes.
Next, let's start filling out the loading state's details.
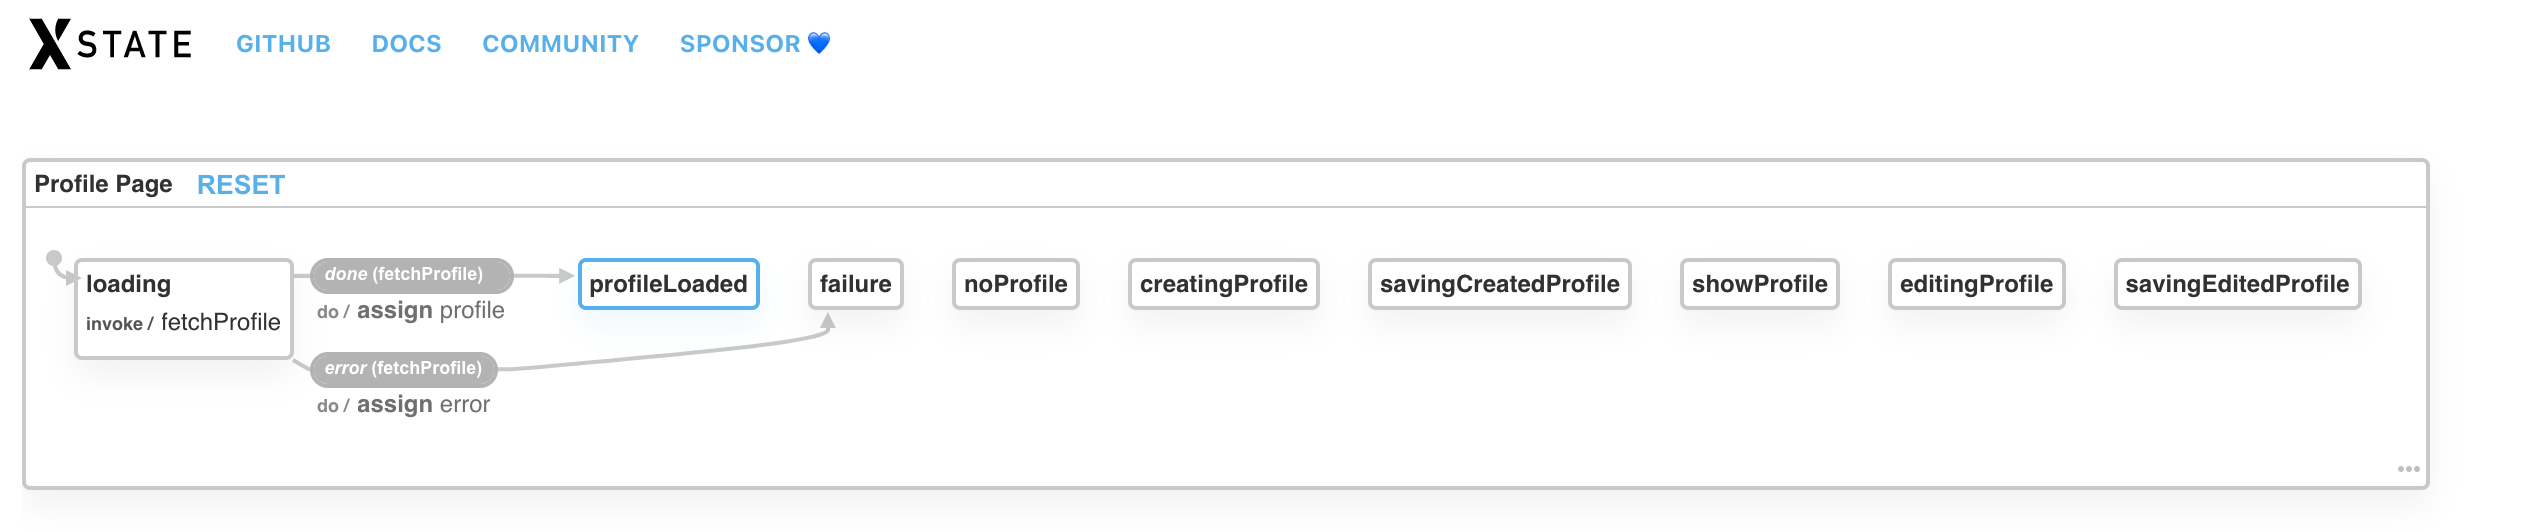
We'll add an invoke property which points to a fetchProfile service which is defined in the second parameter of the createMachine call. This means that when the machine is in the loading state, it will call the function defined in the fetchProfile service. This is an API call which returns a promise and some data.
We've defined onDone and onError properties on the loading state invoke property. These are invoked when the promise resolves or rejects.
If we get a successful response, we trigger XState's assign action to update the context with the event data then move on to the profileLoaded state.
Similarly, if we get an unsuccessful response, we'll transition to the failure state.
import { assign, createMachine } from "xstate";

const fetchMachine = createMachine(
  {
    id: "Profile Page",
    initial: "loading",
    context: {
      profile: null,
      error: null,
    },
    states: {
      loading: {
        invoke: {
          /*
           * The `fetchProfile` service is defined
           * below in the services object
           */
          src: "fetchProfile",
          onDone: {
            target: "profileLoaded",
            actions: assign({
              // update `context.profile`
              profile: (context, event) => event.data,
            }),
          },
          onError: {
            target: "failure",
            actions: assign({
              // update `context.error`
              error: (context, event) => event.data,
            }),
          },
        },
      },
      profileLoaded: {},
      failure: {},
      noProfile: {},
      creatingProfile: {},
      savingCreatedProfile: {},
      showProfile: {},
      editingProfile: {},
      savingEditedProfile: {},
    },
  },
  {
    services: {
      fetchProfile: Api.fetchProfile,
    },
  },
);
Our state chart now looks like this.
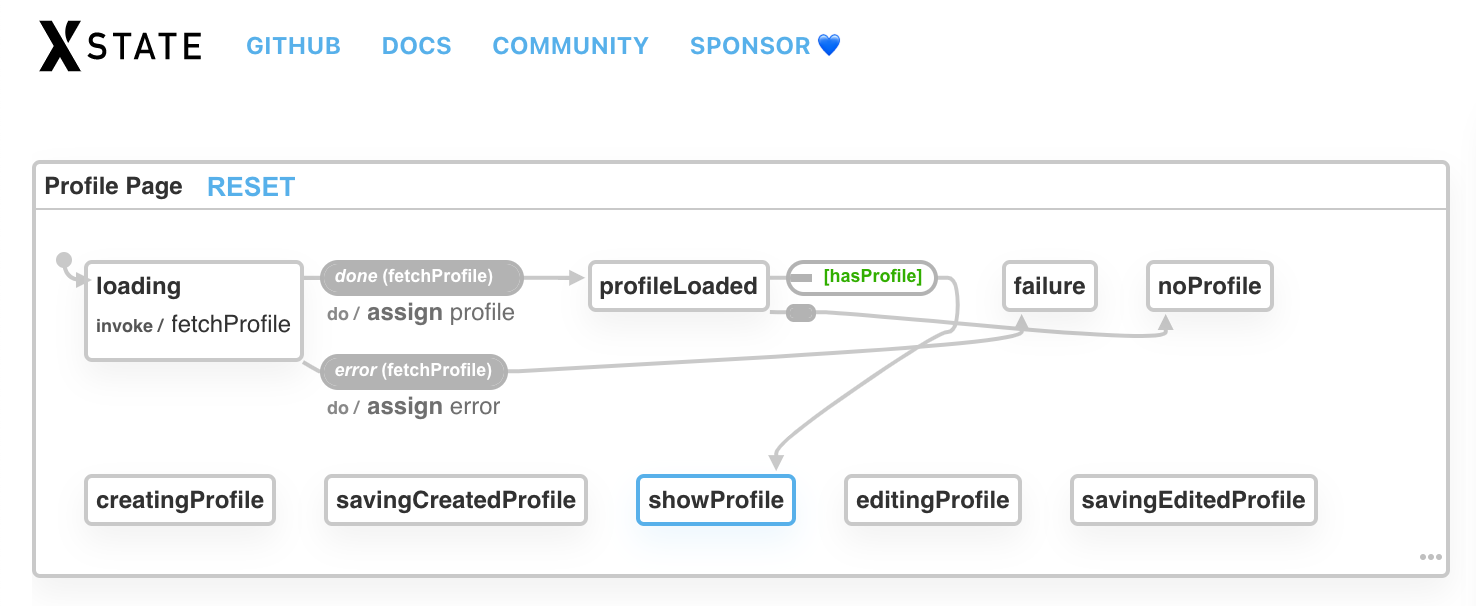
Next, let's add a guard called hasProfile into the second param passed to the createMachine object. This will return a boolean if the profile exists.
We'll also set up the profileLoaded state to check if the profile exists. If it does, move to the showProfile state, and if it doesn't, move to the noProfile state.
We use the "eventless" always property here to automatically move to the next state based on the guards.
import { assign, createMachine } from "xstate";

const fetchMachine = createMachine(
  {
    id: "Profile Page",
    initial: "loading",
    context: {
      profile: null,
      error: null,
    },
    states: {
      loading: {
        invoke: {
          src: "fetchProfile",
          onDone: {
            target: "profileLoaded",
            actions: assign({
              // update `context.profile`
              profile: (context, event) => event.data,
            }),
          },
          onError: {
            target: "failure",
            actions: assign({
              // update `context.error`
              error: (context, event) => event.data,
            }),
          },
        },
      },
      profileLoaded: {
        /*
         * Eventless transitions - `always`
         * They are invoked automatically when the parent's state
         * is active.
         *
         * The condition `cond: 'hasProfile'` is defined in the guards
         * object below. It checks if a profile exists in the context.
         * If true, this transition occurs, if not the next one is attempted.
         */
        always: [
          { target: "showProfile", cond: "hasProfile" },
          { target: "noProfile" },
        ],
      },
      failure: {},
      noProfile: {},
      creatingProfile: {},
      savingCreatedProfile: {},
      showProfile: {},
      editingProfile: {},
      savingEditedProfile: {},
    },
  },
  {
    services: {
      fetchProfile: Api.fetchProfile,
    },
    guards: {
      hasProfile: (context) => !!context.profile,
    },
  },
);
Our state chart now looks like this:
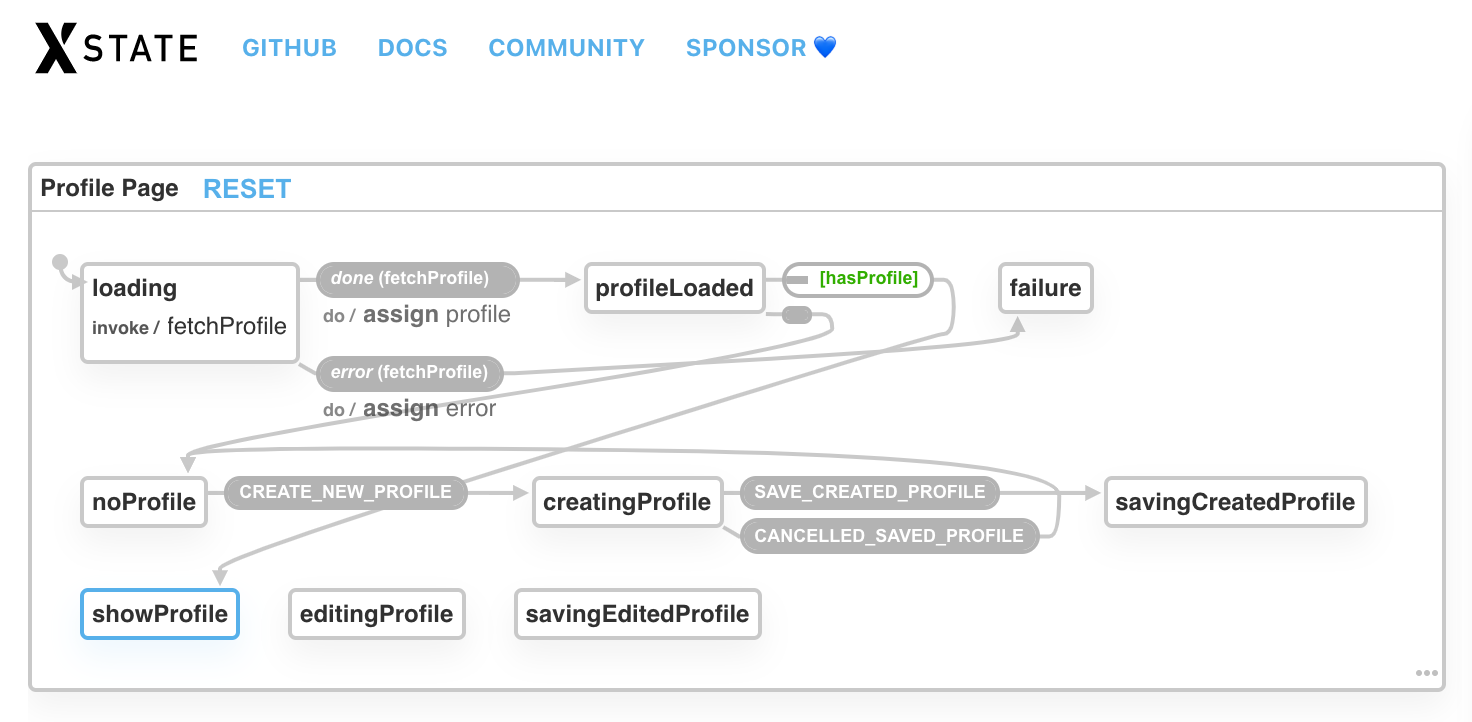
We're now going to add events and transitions for the noProfile and subsequent states.
We've added a CREATE_NEW_PROFILE event on the noProfile state which when triggered, will transition the state to the creatingProfile state.
We've also added events on the creatingProfile state to handle saving and cancelling the created profile.
import { assign, createMachine } from "xstate";

const fetchMachine = createMachine(
  {
    id: "Profile Page",
    initial: "loading",
    context: {
      profile: null,
      error: null,
    },
    states: {
      loading: {
        invoke: {
          src: "fetchProfile",
          onDone: {
            target: "profileLoaded",
            actions: assign({
              profile: (context, event) => event.data,
            }),
          },
          onError: {
            target: "failure",
            actions: assign({
              error: (context, event) => event.data,
            }),
          },
        },
      },
      profileLoaded: {
        always: [
          { target: "showProfile", cond: "hasProfile" },
          { target: "noProfile" },
        ],
      },
      failure: {},
      noProfile: {
        on: {
          // User triggered event and the next state it targets
          CREATE_NEW_PROFILE: "creatingProfile",
        },
      },
      creatingProfile: {
        on: {
          // User triggered events
          SAVE_CREATED_PROFILE: "savingCreatedProfile",
          CANCELLED_SAVED_PROFILE: "noProfile",
        },
      },
      savingCreatedProfile: {},
      showProfile: {},
      editingProfile: {},
      savingEditedProfile: {},
    },
  },
  {
    services: {
      fetchProfile: Api.fetchProfile,
    },
    guards: {
      hasProfile: (context) => !!context.profile,
    },
  },
);
Our state diagram now looks like this:
Putting it all together
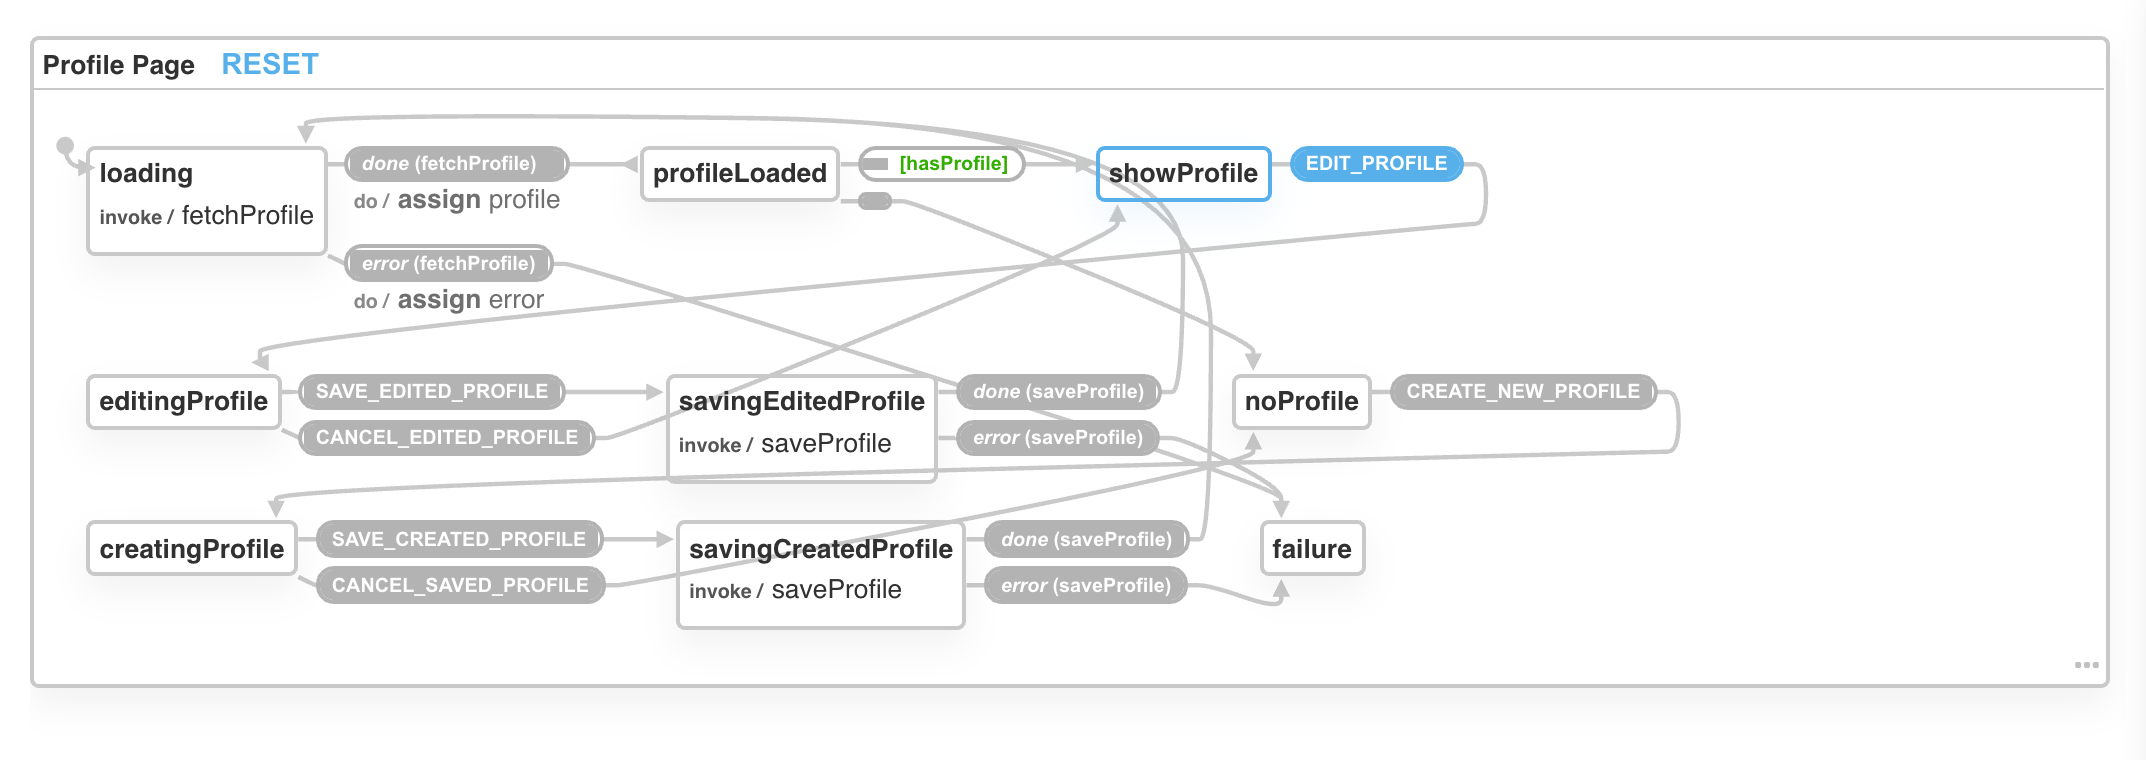
Finally, we'll fill out the rest of the states, transitions and services based on what we know from the previous steps to end up with this:
import { assign, createMachine } from "xstate";

const fetchMachine = createMachine(
  {
    id: "Profile Page",
    initial: "loading",
    context: {
      profile: null,
      error: null,
    },
    states: {
      loading: {
        invoke: {
          src: "fetchProfile",
          onDone: {
            target: "profileLoaded",
            actions: assign({
              profile: (context, event) => event.data,
            }),
          },
          onError: {
            target: "failure",
            actions: assign({
              error: (context, event) => event.data,
            }),
          },
        },
      },
      profileLoaded: {
        always: [
          { target: "showProfile", cond: "hasProfile" },
          { target: "noProfile" },
        ],
      },
      noProfile: {
        on: {
          CREATE_NEW_PROFILE: "creatingProfile",
        },
      },
      creatingProfile: {
        on: {
          SAVE_CREATED_PROFILE: "savingCreatedProfile",
          CANCEL_SAVED_PROFILE: "noProfile",
        },
      },
      savingCreatedProfile: {
        invoke: {
          src: "saveProfile",
          onDone: "loading",
          onError: "failure",
        },
      },
      showProfile: {
        on: {
          EDIT_PROFILE: "editingProfile",
        },
      },
      editingProfile: {
        on: {
          SAVE_EDITED_PROFILE: "savingEditedProfile",
          CANCEL_EDITED_PROFILE: "showProfile",
        },
      },
      savingEditedProfile: {
        invoke: {
          src: "saveProfile",
          onDone: "loading",
          onError: "failure",
        },
      },
      failure: {},
    },
  },
  {
    services: {
      fetchProfile: Api.fetchProfile,
      saveProfile: Api.saveProfile,
    },
    guards: {
      hasProfile: (context) => !!context.profile,
    },
  },
);
Our final state diagram might look a little busy due to the layout, but it has equivalent steps to our original flow chart above.
This diagram represents the business logic that is often ill-defined and scattered throughout your code. The advantage of using a FSM is that we have to think about this state upfront, so we can understand and define it better.
That alone can reduce bugs and miscommunication during the build process, maintenance and additional feature building.
XState React
Now to use this in React, we simply add the @xstate/react package and import the useMachine hook
const ProfilePage = () => {
  const [state, send] = useMachine(machine);

  if (state.matches("loading")) {
    return <LoadingSpinner />;
  }

  if (state.matches("error")) {
    return <ErrorMessage error={state.context.error} />;
  }

  if (state.matches("noProfile")) {
    return (
      <CreateProfileNudge onCreateClick={() => send("CREATE_NEW_PROFILE")} />
    );
  }

  if (state.matches("showProfile")) {
    return <ProfileContent profile={state.context.profile} />;
  }
  /* ... */
};
state is an object that has value (the current machine state) and context (the object with our profile and error).
There is also a matches function on the state object that can be used to match states.
We can send state appropriate events to the machine via the send function. For example, when in the showProfile state, we can call send('EDIT_PROFILE') and the state will transition from showProfile to editingProfile.
When changes to the state object occur, the component will re-render allowing you to respond to those state changes with appropriate UI code.
The wash up
Finite State Machines are a pretty nice way to force you to think about the states your application could be in upfront, then encode those states into a machine which drives your user-experience.
We often deal with this complexity in React using multiple useState or useReducer hooks or global state management solutions.
This approach doesn't need to replace them, but it provides a useful tool in your toolbox to control some of the more complex workflows that you might come up against from time to time.